Wednesday, October 31, 2012

31 Days Series: Day 31

 Happy Halloween and I hope you have enjoyed making these crafts and snacks with your kids this month as much as my girls and I did!  One last snack idea...take some of the things you have left from making the snacks this month and throw them together for a quick Halloween snack mix.  (pretzels, candy corn, popcorn, gummy worms, almond slices, M&M's, Reeces Pieces, small pieces of graham crackers, etc.) Great to take to a Halloween get together or just a snack to keep on hand for the kids.  Here's the last craft for this month....enjoy!!


Monster Feet
 This craft is your chance to be as creative as you would like.  Make your monster feet unique as you are! 

Supplies:
-rectangular tissue boxes (2 per child)
-paint (whatever color your want your feet to be)
-sequins, pom poms, fake fur, whatever you like!
-glue
-craft foam for the claws (green or yellow are good choices)

Directions:
1.  paint the tissue boxes (you don't need to paint the bottom)
2.  Let dry.
3. Cut triangle pieces from the foam and glue them on for claws.
4.  Decorate your monster feet however you choose.
5.  Let the glue dry.
6.  Stomp around the house!

Here's how our feet turned out:
I put all kinds of craft stuff on the table and told the girls to have at it :)  I have to say, they were definitely creative!

Here's our Halloween snack mix:
I got the bowl at Dollar General for  $1 - $2.
 Idea from: http://www.activityvillage.co.uk/monster_feet_craft.htm 

Don't forget to follow me on Facebook!

So What Wednesday...

It's that time again...to link up with Shannon at Life After I "Dew" for...

So What Wednesday
 
  So this week I'm saying "So what" if... 
 
  • I had such an awesome time playing paintball over the weekend! Honestly, I was scared to death about it because I didn't want to get hit with a paintball (which is one reason I chose the costume I did) but it was so fun and I only have a few bruises...totally worth it and I can't wait to play again! On top of being just plain fun,  I got a much needed break from the kiddos and got to take shots at the hubs...who wouldn't have fun! ha

That's me in the middle front...yep I was Donkey Kong! And that's the hubs, I mean Luigi, laying down. We had so much fun dressing as Mario characters...I can't wait to hear the theme for next time!
  •  We had a little cookout with my family (since we were staying at my parents' house) for Archer's birthday and I wanted him to be able to have presents to open.  Since he got a Lifetime Hunting and Fishing License ($200!) for his birthday, I didn't want to spend much money on things he would actually enjoy right now. So, I went to the consignment store and got him 6 toys (all cars because that's the only thing the kid will play with) for $25! He was in heaven :)
  • I am totally that mom who dresses her kids in themed Halloween costumes.  My 4 year old is very into Dorothy from Wizard of Oz so I went with that and talked my 6 year old into being Glinda the Good Witch and my son (who has no clue what's going on...he's 1) is a Lollipop kid.  I figure I better use their cuteness while they will still let me. I have a feeling I don't have many more Halloweens left to be able to talk my 6 year old into being what I want her to be :(
  • Harper (my 6 year old) didn't have school Monday and we were extra lazy. My younger two have bad colds (Harper just has a stuffy nose) so we pretty much stayed in pjs all day and watched a few movies.  I really didn't want to send her to school yesterday and was secretly hoping her stuffy nose would make her not want to go. I will cherish those few No School days now like I never have before! 
Happy Halloween to everyone!
 
And remember to join me on Facebook 

Tuesday, October 30, 2012

31 Days Series: Day 30

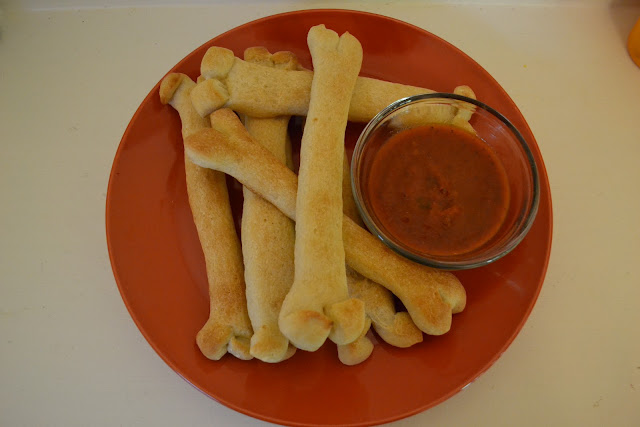
 Salty Bones
This would be a great snack or on the buffet table at a party or you could put a Halloween twist on pizza night!

Supplies:
-1 tube of refrigerated breadstick dough
-coarse salt
-marinara dipping sauce

Directions:
1  Open the tube of dough and separate the pieces.
2.  Take one piece of dough and roll it, stretch it out a little.
3.  Using a knife or scissors, cut a 1 1/2 inch slit into the center of both ends.
3.  Shape the ends you cut into knobs.
4.  Put dough on a greased baking sheet and sprinkle with some coarse salt.
5. Bake until dough is golden brown, 375 degrees for 10-13 minutes.
6.  Serve with marinara dipping sauce aka "blood"

 I was slightly distracted when I was making these and totally forgot the coarse salt...ahhh darn!

Idea from:  http://spoonful.com/recipes/salty-bones?print=true

Halloween Teacher Gift

So I love having little teacher gift for the girls' teachers for any occasion. Being a former teacher, I always loved getting a little something from my students.  It made me feel appreciated by not only the student but the parents.  With that said, I set out to make a cute Halloween treat for the girls to take to school.  I found an awesome recipe for Pumpkin Puppy Chow on Pinterest.  Then we used the Ghost Treat Holders from my 31 Days Series to hold the puppy chow.  I also found a cute little poem to attach.  I cannot remember what site I found it on but there is a picture so you can see the words.


Pumpkin Puppy Chow
Three ingredients and so easy!
  • 9 cups of rice chex
  • 1 1/2 cups of powdered sugar
  • 1 bag of pumpkin spice Hershey Kisses (I found them at Wal-Mart)
Directions
~Put the 1 1/2 cups of powdered sugar into a gallon size baggie.
~Dump the 9 cups of cereal into a large bowl.
~Using the boiler method (I don't own a boiler pot so I put some water in a regular pot and placed a metal bowl on top) melt the Hershey Kisses.
~Once they are melted, pour over the cereal and mix until all the cereal is covered. ( I didn't think it was enough to cover all that cereal but I promise if you keep mixing, it will be enough.)
~After the cereal is covered, pour it into the baggie that your sugar is in. 
~Seal it and hand it over to your kids to mix up. Mine loved shaking the bag and getting the sugar all over the cereal.
The Kisses melting in my "boiler pot"
Mixing the melted Kisses into the cereal
YUMMY!

After that was made (in no time at all), we got the Ghost Treat Holders out and put the Puppy Chow in them.  I wanted to make taking these to school as easy as I could for my daughter. So I had a few left over Halloween buckets, that have a handle on them, (from the Dollar Tree) and put them down inside that.  I taped the Halloween poem on the outside of the bucket for her teachers to see. 

I had Harper write her name on the little plate that goes under the pot :)

The bucket with the poem taped onto the outside


 Whether you use this idea or not, I hope you remember to show your child's teacher some love for all they do!

*If you don't have time to hunt down a white pot (I found ours at Wal-Mart) use a terra-cotta one (found at Michaels) and make a Jack-o-lantern face like we did on Day 23. Or you could even take the Puppy Chow or another treat to them on the Halloween Plate (found at Dollar Tree) we made.

 Remember to follow me on Facebook!

Monday, October 29, 2012

31 Days Series: Day 29

 Toliet Paper Bats
 This craft is fun for the kids to make and if you add some little treats inside, they are great to have at parties or share with friends.  If you do not have card stock, use construction paper...that's what we did. *tip: Use chalk or white crayon to draw out your wing pattern.

Supplies:
-toilet roll tube or you can cut a paper towel roll tube into smaller pieces
-grey or black card stock

 -black paint
-string or yarn to hang-you can get black shoe laces (3 pairs per pack) at the dollar store and use them to hang
-wiggle eyes
-double sided tape
-small candies (optional)


Directions:
1.  Paint your toilet paper tube black.
2.  Let dry.
3.  Poke a hole through the top, center of the tube and put your string in so you can hang your bat up.
4.  Cut two wings from your card stock.
5.  Tape your wing to both sides of the tube.
6.  At the ends of the tube, push the sides in so they fold over each other and close the tube up.
7. If you want to share this with friends or have at a party, add some small pieces of candy inside before you close the tube up.

Sunday, October 28, 2012

31 Days Series: Day 28

Two Ingredient Muffins
This is a fun way to spend some time in the kitchen with your little one.  You don't have to worry about them getting raw egg on them either!  It doesn't get much easier to make a baked treat than this recipe!

Supplies:
-1 box of spice cake mix
-1 can of pumpkin
-muffin liners
-mini chocolate chips (optional) 
-powdered sugar (optional)

Directions:
1. Dump spice cake mix into a large mixing bowl.
2.  Add in the can of pumpkin.
3. Stir until all is mixed together.
4.  Put muffin liners in a cupcake/muffin pan
5.  Fill muffin liners 2/3 full.
6.  Bake at 350 degrees for 20-25 minutes.
Ours made 18 muffins

**I have heard that doing this with chocolate and carrot cake mix is delicious as well!
**I found that the muffins were even more moist after they sat for a couple of days!
We stuck to the two ingredient title and didn't add chocolate chips or powdered sugar but will definitely try it in the future!
**excuse the hole in the cake box...I had to cut out the box top to send in to school for my oldest daughter
My preschooler wanted to take these for her snack to share at school so we got some cute muffin liners and picks at Dollar Tree.

Idea from Pinterest but I found it on Life After I "Dew". Its a great blog-check it out!!

Saturday, October 27, 2012

31 Days Series: Day 27

 Ghosts Treat Holders
This is about as simple as it gets...yet still super cute!  Great to have at parties to hold some goodies or to give as a Halloween teacher gift.  I got these pots at Wal-Mart for $1.50.

Supplies:
-small white plant pots (or paint another color pot with white paint)
-black permanent marker or paint pen

Directions:
1.  Using your marker or paint pen, draw two eyes and a mouth on the pot.
2.  Optional:  draw on a pink bow to make it a girl ghost :)


Friday, October 26, 2012

31 Days Series: Day 26

 Witch Hats
Very simple snack to make with kids or to have out on the buffet table at a Halloween party.

Supplies:
-Keebler Fudge Strip cookies (1 per hat)
-Hersey kisses (1 per hat)
-orange frosting

Directions:
1.  Unwrap a Hersey kiss.
2.  Add a dollop of orange frosting on the bottom of it.
3.  Place down in the middle of an upside-down Fudge Strip cookie.

Friday Favorites...

I have decided to start posting some of my favorite things on Fridays.  I have no guide lines, it's just going to be something I have tried and loved enough to share. It could be a recipe, kids product, baby item, craft, cleaning product...like I said anything I have tried and fallen in love with! This week it's Shaklee's ScourOff. My only regret is I didn't try this stuff sooner! Instead of me going on and on about how much I love it (because I totally could) I'll let the pictures do the talking.

When we moved into this rental house, the sink was one thing I could not get clean...no matter what I tried.  And it was embarrassing because it looked like I had never even tried to clean it.  All I had to do was get a sponge, put some ScourOff on it, rub it in all over the sink, and wash it off with warm water. Took me like 2 minutes to get these amazing results...

 After seeing how easy it was to clean with this stuff, I had to go tackle the shower. I can not believe I'm going to post these pictures...don't judge! I HATE how gross the shower looks.  I seriously clean it more than anything else in the whole house, yet it looks the nastiest.  

 The picture doesn't do it justice! Let's just say, I know longer dread opening up my shower curtain :)

Oh and got a bonus for you...this stuff smells yummy enough to eat.  Now don't go eating it but seriously what other tough jobs cleaning product smells good?!  I only wish computers had smell-o-vision so you could smell it for yourself :)  It's a paste so it doesn't form dust clouds like Ajax or Comet and its made from natural ingredients so it won't burn off your nose hairs while your cleaning!  It can be used on sinks, tile, grout, ovens, ovenproof glass, stovetops, ceramic tiles, porcelain sinks and baked enamel!!

If you are interested in this Shaklee product or any of the other amazing Get Clean items, check them out here I promise you will love them!

Thursday, October 25, 2012

31 Days Series: Day 25

 Halloween Candles
This is a fun and easy way to brighten up your Halloween decorations.
You can get glass candle holders in all sorts of shapes and sizes at Dollar Tree.  You can be as creative as you want to with this craft.  It can be as simple as wrapping tissue paper around the glass jar or you can take it a little farther and add Halloween shaped cut outs. Since my kids are 4 & 5 we stuck with the simple version :)

Supplies:
-glass jars (small mason jars or glass candle holders work great)
-tissue paper-white, orange, purple and/or black
-black construction paper
-candles to fit in your jars
-scissors
-glue (we used glue sticks)

Directions:
1.  Wrap your jar in tissue paper (use your glue to make it stick).
2.  Insert a candle.
3.  Light it!

If you want to get a little more creative click here for some templates.

Here are some decorative ideas from  Activity Village :
 Pumpkin face - use orange tissue paper and cut out a lantern face before wrapping around the jar.
Spider web - use white tissue paper, having first drawn a spider web onto it with black felt tip pen. You could attach a small plastic spider into the middle of the web for a 3D effect.
Bats - use white tissue paper. Cut a number of small bat shapes out of black construction paper and glue them to the tissue paper randomly.
Witch - use purple tissue paper. Stick on a selection of silver stars and add, towards the bottom of the jar, a black cat cut out of black construction paper.
This is what the girls came up with...a mummy, a witch, a jack-o-lantern and a ghost. Like I said, they are still young but you can be creative if you want to and get a little more decorative with yours!

Idea from:   http://www.activityvillage.co.uk/halloween_candle_jars.htm

Thursday's Tip of the Day...

Since next week is Halloween, I thought I'd make my tip of the day related to that.  This is something I started doing on Harper's (my oldest) first Trick-or-Treating Halloween. Her real first Halloween she was only 2 1/2 weeks old so we stayed at home that year. But the next year, we headed out with her cousins for her first real Halloween experience.  I wanted to be able to look back and remember a few little things from each year so I got her a cotton bag for trick-or-treating.  Each year I have written a few little memories down on the back of the bag...like who we went with, what costume was worn, etc. Now her sister has a bag with her four Halloween memories on it and this year we get to start one for her little brother.  I hope they can look back on these bags when they are too old for trick-or-treating and reminisce on those fun nights they had.
I use a fabric marker to write on the bags.
Harper had to add a picture to her bag last year (hers is the one on the left)

Follow me on Facebook

Wednesday, October 24, 2012

31 Days Series: Day 24

 Slimy Jello Snacks
This is a fun after school snack to have ready for the kids or an after dinner treat or a great treat to serve at Halloween parties.

Supplies:
-a box of green Jello (lime or apple)
-a box of another color of Jello: red, blue or purple works well
-8 oz mason jars or similar glass bowl or cup (1 per child)
-gummy worms (4-6 per child)

Directions:
1.  Using the directions on the box, prepare the green Jello.
2.  Divide among your glass containers.  Only fill them halfway up.
3.  Refridgerate them until Jello is firm.
4.  Prepare the second box of Jello.
5.  Before you add the second Jello in the container, put a few gummy worms in the glass and dangle 1-2 over the side.
6.  Pour Jello on top of gummy worms, filling glass to the top.
7.  Refridgerate until top Jello is firm.
8.  Serve!
My girls wanted to try the sour gummy worms so that's what we used this time.
Idea from:  http://www.parenting.com/article/slimy-jell-o-snacks

So What Wednesday...

Linking up again with Shannon at Life After I "Dew" and saying...

So What Wednesday

This week, I'm saying so what if...

-I make lists for everything! I have Mommy ADD, you know where you go to do something and then you get sidetracked and do something else and you finally think about that first thing you went to do when you're laying in bed at night....yeah that's me. So my solution, is to have a little notebook I carry around with me everywhere so I can make, add  to, mark off all the lists I make during the day/week.

-We went so low key for our son's first birthday yesterday.  No party, I made his little cake, a couple of helium balloon from the Dollar Tree, a Happy Birthday banner we've had for years. I guess what they say is true about going all out for the first child and its down hill from there.  Little man is our third and last so he doesn't get all the frills his sisters did. He won't even remember so why spend a couple hundred dollars on a party (like we did for baby #1)??

-I have decided yoga pants are my outfit of choice.  I seriously will wear them everyday until I need to leave the house for something like a parent/teacher conference, then I will throw on something a little nicer...maybe :) I have taken my daughter to preschool in them several times now..good thing she isn't old enough for me to embarrass her...yet.

-I probably let my four year old daughter watch too much tv.  Ever since her sister went to kindergarten this year, she won't play by herself.  She constantly wants me to play with her and I do but I also need to do some cleaning, laundry, etc. So when I can't handle one more Barbie or princess roll playing game, I turn on the TV for her. I will say we do not have cable so the only channel we get that she watches is PBS and those cartoons are educational, so I don't feel too bad about it :) 

-I'm a little obsessed with candles right now...you know the Fall smelling ones like Mulled Cider, Warm Apple Pie, Pumpkin Spice, etc.  Having those yummy smells around the house makes it feel more Fall-ish especially since our temps outside sure don't (80 degrees is the average this week here...crazy!)

-I'm going to do something not very Mommyish and play paintball this weekend.  I have never played before but I'm excited. My brother and his girlfriend are having a Mario themed paintball extravaganza and since its close to Halloween, everyone has to dress up like a Mario character.  The hubs is going to be Luigi and I'm going to be Donkey Kong (we have an old gorilla costume my dad used several years back that has just been collecting dust in the attic so I thought I'd put it to good use).  Check back later for pics :)

Have a great week everyone and don't forget to check me out on Facebook!


Tuesday, October 23, 2012

31 Days Series: Day 23

Terra-Cotta Jack-O-Lanterns
Great party Halloween party favors!  You can get all sizes of pots at Michael's. I got the three smallest sizes and they were $.59, $.69, $.89 a piece.  If you can't find terra-cotta pots you can use small plastic ones.  The paint won't stick as well or show up quite as well but we gave it a try anyway just to see. (pic below)

Supplies:
-mini terra-cotta pots
-yellow craft paint
-fine tip black marker

Directions:
1. Add a Jack-O-Lantern face to your pot with the yellow paint.
2.  Let dry.
3.  Outline the face with your fine tip black marker.
4.  Put some Halloween candies in your Jack-O-Lantern. 
**After some trial and error (that's why only one of the plastic pots got photographed) I found the easiest way for my children (ages 4 & 5) to make the face, was for me to draw it on with the marker first then let them paint inside the lines with the yellow paint.  Then after they painted, I went back over the lines again with the permanent marker. You can decide what's best for your kids depending on their age. 
Here are our terra-cotta pots.
This is the plastic one.
Idea from:  http://crafts.kaboose.com/pumpkin-jack-o-lantern-pots.html

Dear Archer,

The first year of your life sure brought many changes to our family but we have grown together and you have completed us! We had a rough first few months but look at us now.  You have grown into a wild, mischevious, stubborn, outdoor loving, obsessed -with all-things-with-wheels little man.  Your first two words were "car" and "truck." (Although they sound a little different when you say them :) And riding the four-wheeler with Daddy is your favorite thing to do.  You have always been a mommy's boy but Daddy is quickly gaining ground in the favorite category.  As soon as Daddy gets home from work, you crawl to him and when he picks you up, you immediately point to the door.  You know he will take you outside :)  Your big sisters love you so much that I have to remind them to let you breath sometimes...they would kiss and hug on you all day. 

I love that you:
-cuddle with me at bedtime.
-are always in the same corner of your bed in the morning, no matter where I lay you down in the bed at night.
-have to sleep with Eebee (he's your best buddy) and if you are upset you hug on him.
-are so happy when you wake up in the morning and from nap.
-love your sisters...you squeal and wave when you see them first thing in the morning.
-are so much like your daddy...I hope you grow up to be the same kind of man/daddy he is!
-quickly point to Daddy's shed (where he keeps the four-wheeler) and say, "Ca" every time we walk out on the back porch or go in the backyard.
- sign "bath" and point to the bathroom every time I ask you if you want to take a bath.
-have your great grandmother's name as your middle name...she would be so proud of you and show you off to everyone.

I hope that you:
-become a better traveler asap!
-grow out of your dairy allergy :(
-learn to walk soon :)
-keep your love for all things that go...Daddy will love to rebuild cars with you one day!

We love you so much Archer Edmisten Smart and thank God every day for letting you be the one to make our family complete!  We can not wait to see the man you will become but right now we are just fine with your being our baby.

Love you more than all the wheels in the world-

Mommy

October 23, 2011-Asheville, NC
1st day in our Durham house
1st time taking your monthly picture in our Haw River house


October 23, 2012 pic coming soon!