Showing posts with label Halloween party treats. Show all posts

Tuesday, October 30, 2012

31 Days Series: Day 30

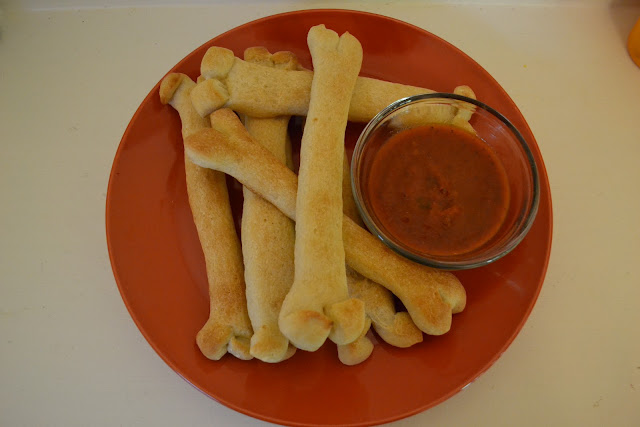
 Salty Bones
This would be a great snack or on the buffet table at a party or you could put a Halloween twist on pizza night!

Supplies:
-1 tube of refrigerated breadstick dough
-coarse salt
-marinara dipping sauce

Directions:
1  Open the tube of dough and separate the pieces.
2.  Take one piece of dough and roll it, stretch it out a little.
3.  Using a knife or scissors, cut a 1 1/2 inch slit into the center of both ends.
3.  Shape the ends you cut into knobs.
4.  Put dough on a greased baking sheet and sprinkle with some coarse salt.
5. Bake until dough is golden brown, 375 degrees for 10-13 minutes.
6.  Serve with marinara dipping sauce aka "blood"

 I was slightly distracted when I was making these and totally forgot the coarse salt...ahhh darn!

Idea from:  http://spoonful.com/recipes/salty-bones?print=true

Friday, October 26, 2012

31 Days Series: Day 26

 Witch Hats
Very simple snack to make with kids or to have out on the buffet table at a Halloween party.

Supplies:
-Keebler Fudge Strip cookies (1 per hat)
-Hersey kisses (1 per hat)
-orange frosting

Directions:
1.  Unwrap a Hersey kiss.
2.  Add a dollop of orange frosting on the bottom of it.
3.  Place down in the middle of an upside-down Fudge Strip cookie.

Wednesday, October 24, 2012

31 Days Series: Day 24

 Slimy Jello Snacks
This is a fun after school snack to have ready for the kids or an after dinner treat or a great treat to serve at Halloween parties.

Supplies:
-a box of green Jello (lime or apple)
-a box of another color of Jello: red, blue or purple works well
-8 oz mason jars or similar glass bowl or cup (1 per child)
-gummy worms (4-6 per child)

Directions:
1.  Using the directions on the box, prepare the green Jello.
2.  Divide among your glass containers.  Only fill them halfway up.
3.  Refridgerate them until Jello is firm.
4.  Prepare the second box of Jello.
5.  Before you add the second Jello in the container, put a few gummy worms in the glass and dangle 1-2 over the side.
6.  Pour Jello on top of gummy worms, filling glass to the top.
7.  Refridgerate until top Jello is firm.
8.  Serve!
My girls wanted to try the sour gummy worms so that's what we used this time.
Idea from:  http://www.parenting.com/article/slimy-jell-o-snacks

Saturday, October 20, 2012

31 Days Series: Day 20

 Spooky Brownies
Take a regular treat and turn it into something to share for Halloween.

Supplies:
-brownie mix (and the ingredients the box calls for)
-Halloween shaped cookie cutters-from one to as many as you want
*I got a container of 18 Halloween cookie cutters at Wal-Mart for $8.97
-powdered sugar
-small candies or tube of icing

Directions:
1.  Bake the brownies as directed on box.
2.  Let cool.
3. Use cookie cutters to cut brownies into Halloween shapes.
*I did have some trouble getting my cut brownies out of the pan, so make sure you spray your pan with cooking spray and use a butter knife to help pry the brownies out in one piece.
4.  Add eyes, etc and sprinkle with powdered sugar.
We used a cauldron, tombstone, cat, spider and bat cookie cutters.  You can use mini M&M's for the eyes.  I had tube of orange icing so I used that.
**I have definitely gotten my money out of the cookie cutter set because I use them to make my daughter's sandwiches into Halloween shapes for her school lunch. She loves it and can't wait to see what shape she gets in her lunch box that day!

Thursday, October 18, 2012

31 Days Series: Day 18

 Halloween Indoor Smores
This is a fun and easy snack that you won't have to build a camp fire for. 

Supplies:
-graham crackers
-Nutella (or similar chocolate/hazelnut spread)
-marshmallow fluff
-Halloween sprinkles

Directions:
1.  Break graham cracker into squares.
2.  Spread Nutella on one cracker square and fluff on another cracker square.
3.  Put the squares together.
4.  Optional step: Put cracker "sandwich" in microwave for 8-10 seconds.
5.  Dip the sides of the cracker into sprinkles.  You can use orange and black or any Halloween themed sprinkles. (We used black & yellow bugs)

Monday, October 15, 2012

31 Days Series: Day 15

 Graveyard Dirt
You might remember this fun treat from your childhood.  You can let your kids help you make this but I made it ahead of time and gave it to my kids for a fun after dinner dessert.  You don't need many supplies for this one so its low cost!

Supplies:
-instant chocolate pudding
-crushed cookie part of an Oreo (or we used chocolate graham crackers)
-gummy worms
-small clear plastic or glass cups

Directions:
1.  Make pudding according to package.
2.  Spoon it into your small plastic or glass cup.
Place gummy worms in pudding, sticking out of the top.
4.  Put cookies/graham crackers in a baggie and crush them.
5.  Sprinkle cookies/graham crackers on top.


Thursday, October 4, 2012

31 Days Series: Day 4

 Egg Cup Treat Holders
Parents can make this craft for a special after dinner treat for younger children. Kids ages 4 and up can make it themselves (with a little help).  You can paint them whatever colors you would like.  My kids wanted to do white for a ghost, green for a witch or Frakenstein, black for a vampire, orange for a pumpkin, yellow for a glowing candle, and purple for a monster. As far as cost of this craft:  buy your next carton of eggs in a cardboard carton, you can get tissue paper, paint and wiggle eyes at Dollar Tree, you probably already have scissors and glue. So the biggest expense would be the candy, which isn't going to set you back too much.  You might even have some you've already bought...it's hard to resist all that yummy stuff every time you go grocery shopping :)

Supplies:
-cardboard egg carton with the cups cut apart
-paint in Halloween colors
-tissue paper in Halloween colors
-scissors
-glue stick 
-wiggle eyes (2 per cup)
-small Halloween candies (M&M's or Reeses Pieces or candy corn work great)

Directions:
1. Trim egg cups with scissors so they will have a neat edge.
2. Cut 3 inch squares from tissue paper.
3. Paint egg cups in Halloween colors and let dry.
4. Use glue stick to put a dab of glue in the center of a tissue paper square.
5. Glue side facing downward gently press center of tissue paper into center of the inside of the egg cup.
6. Glue two wiggle eyes on each cup. (if glue sticks don't hold them, try using white glue)
7. Fill with small Halloween treats.

Find me on Facebook 

 Idea from:  http://crafts.kaboose.com/egg-cup-treat-holders.html